openHAB Installation Instructions
To create your very own openHAB web server:
- Install openHAB on your machine
- Follow the configuration instructions to get your server up and running.
There are several guides for installing openHAB. Follow one of these guides to the point that you have the openHAB dashboard up in your web browser.
The openHAB.org website has Installation Instructions that cover all types of systems. The following four installation guides have detailed step-by-step instructions:
- openHAB Installation for Windows
- openHAB Installation for OSX
- openHAB Installation for Linux using the Command Line
- openHAB Installation for Linux using the GUI
Okay hopefully the installation went smoothly and you are at the page that says:
Welcome to openHAB 2 - Initial Setup
At this point select the Standard recommended setup and then the Paper UI.
Next:
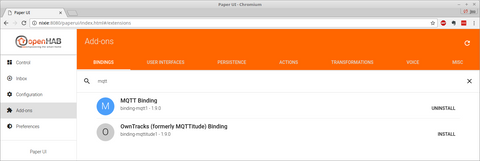
- click on the Add-ons button on the left side,
- then the BINDINGS tab,
- then type 'mqtt' into the search box
- and INSTALL on the MQTT Binding.
You should then see:
We now need to point openHAB to our MQTT broker. This will involve editing the file /etc/openhab2/services/mqtt.cfg. This will have to be done with root privileges. If you do not have a favorite editor you can try:
sudo xed /etc/openhab2/services/mqtt.cfg
If this doesn't work try:
sudo nano /etc/openhab2/services/mqtt.cfg
We need to add three lines to the file:
Initially the file consists entirely of comments (lines that begin with '#'). You can put the 3 lines anywhere in the file but it is best to put them beneath the comment that describes them. So find the following spots to insert the new line (the new line is in bold):
# URL to the MQTT broker, e.g. tcp://localhost:1883 or ssl://localhost:8883
#<broker>.url=tcp://<host>:1883
mqtt:localBroker.url=tcp://localhost:1883
Optional. Client id (max 23 chars) to use when connecting to the broker.
# If not provided a default one is generated.
#<broker>.clientId=<clientId>
mqtt:localBroker.clientId=openHab
# Optional. Set the quality of service level for sending messages to this broker.
# Possible values are 0 (Deliver at most once),1 (Deliver at least once) or 2
# (Deliver exactly once). Defaults to 0.
#<broker>.qos=<qos>
mqtt:localBroker.qos=1
Then save the file. Next we add a sitemap file by File->New in the editor. Then copy the following:
sitemap engimusing label="Engimusing Home Automation"
{
}
and File->Save As to /etc/openhab2/sitemaps/engimusing.sitemap
put user in openhab group.
sudo usermod -a -G openhab joeg
sudo chmod -R g+w /etc/openhab2
Configuration Instructions:
The configuration instructions are the same for all systems and consist of copying files to various parts of the openhab/configurations folder. This folder is in the base openhab folder.
In Windows we put it at C:\openhab and in Linux and OSX it is in /etc/openhab/.
We will first set up a simple configuration that you can start with. Later we will show how to customize it to fit your needs.
LInux:
Linux Configuration Instructions
OSX:
OSX Configuration Instructions
Windows:
Windows Configuration Instructions